
Once you have repaired the Exploration Tower you can join a Team (or create your own), and compete in the weekly competition.
It’s a series of tasks to gain points and energy with potential rewards at the end. You are transported to the Forbidden Ruins which has 3 maps containing 5-9 areas. Once you’ve gained enough points in an area the way to the next one opens. When you finish all of the areas in a map you then gain access through a large gate to the next map

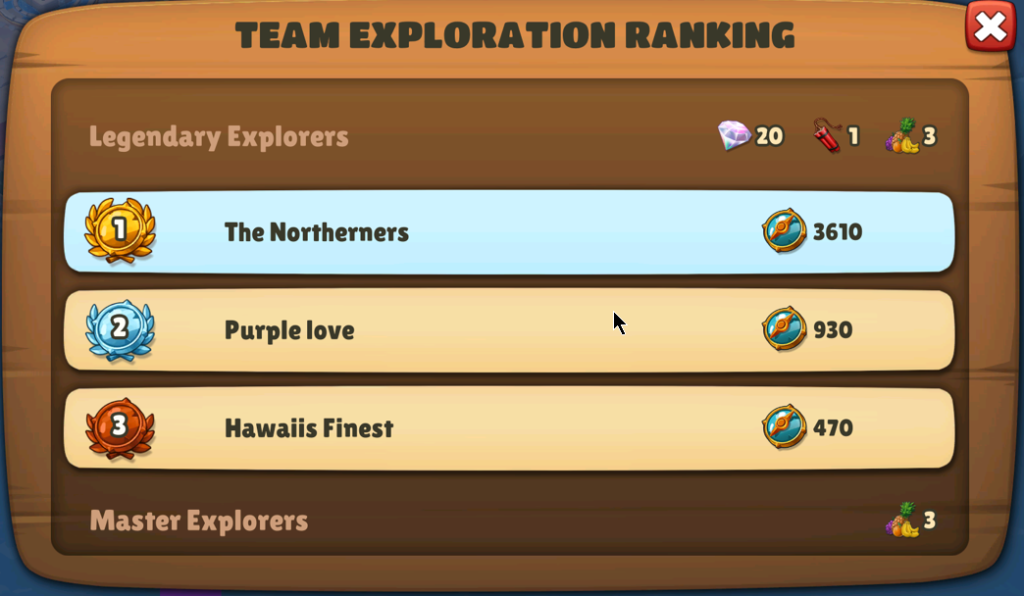
You can check your Team’s ranking from the Forbidden Ruins window, as shown below.
The Competition lasts for six days – Tuesday through Sunday. At the end the points are tallied and the winners receive a popup window announcing their rewards. Note: the tallying process can take 2-3 hours after the end of the competition, so please be patient if you’re expecting rewards.
Note: Once you select a task you have a limited time to complete it; if you don’t finish it in time then another (sometimes harder) task becomes available in 30 minutes.
If a task does not suit you you can re-roll it once using the button, and a new one will appear (subsequent re-rolls require 5 gems). Re-rolling is especially helpful in avoiding long-term resource gatherings or harvests. And, if you make a mistake in choosing a task you can Cancel it and it will then reset to the same task for later use.
Team Competition – Forbidden Ruins Area’s Tasks Table
| Map # | Area 1 | Area 2 | Area 3 | Area 4 | Area 5 | Area 6 | Area 7 | Area 8 | Area 9 |
| 1 | H | A, H | M | A, H | G, O | ——– | ——– | ——– | ——– |
| 2 | A, H | G, H | M, O | A, D | G, H | B | D, M | ——– | ——– |
| 3 | G, H | A, O | D, M | B, H | A, G, H | D, G, M | H, M, O | B, G | A, D, M |
A = Animal Products Collection
B = Boat Completion
D = Delivery
G = Gather Resources
H = Harvest Crops
M = Manufacture Products
O = Order Board Sale
Animal Products Collection – Collect milk, eggs, wool, and truffles from your farm animals; these tasks usually require 2-3 collections from the maximum number of animals per yard; suggest feeding up all of your animals prior to the start of the competition and then leave their products waiting in the fields in order to get a head start on these tasks.
Boat Completion – Fill all 9 crates on a single cargo boat. Since the boat will be there for 15 hours suggest checking the boat the day before by looking at the board above the Dock (but don’t tap/click on it) and harvesting/collecting/creating the needed items early; if you can’t fill those crates easily then send the boat off empty and check the new requirements that appear; generally you’ll need “fast” crops (examples: peas, wheat, sugar cane), “long-term” crops (examples: strawberries, cucumbers), and 3-9 manufactured products (examples: waffles, cheese, glass). You can fill all of the crates prior to the boat task , but then wait until you “take” the exploration task to “claim” the filled boat.
Delivery – Provide already-created products or crops, much like the Order Board. You can do deliveries independently of other active tasks.
Gather Resources – Collect natural resources from the Village, map stages, special event areas such as mazes, and Rifts. If you have the Resource Factory building you can also use it to generate and then gather resources. These tasks are the most costly in energy (and time) so plan ahead and use your energy wisely.
Harvest Crops – Grow and harvest crops in field plots and/or greenhouses; these tasks often require three or more plantings per task. Example: you have 12 field plots and the task requires 42 wheat (3+ harvests). Suggest you plant all plots and greenhouses the night before they are needed in the competition (see table above) with long-term crops such as strawberries or tomatoes to get a potential head start.
Manufacture Products – Create the tasked products in your buildings; suggest creating a surplus of raw materials prior to the competition (examples: iron bars, fire, flour, milk, gravel, etc.).
Order Board – Complete 2-4 orders on the Board within the tasks’ time limits; suggest checking the current orders on the Board the day before they’re needed, trashing any orders that you can’t easily fill to get new ones that you can, and then creating the needed items.